Works with the AI Agents you already use
 Claude Code
 Cursor
 Codex CLI
 DeepSeek
 Muse+22 moreClaude CodeCursorCodex CLIDeepSeekMuse
 Dots
 Manus
 Grok
 Grok Bot+18 agents
print3d designer: design, check and slice 3D prints
This skill makes your agent design in code and prove each model with numbers and a real slice before anything is printed.
Free

print3d designer: design, check and slice 3D prints
Example session with this skill installed
Make this gift box from the photo as a 25 mm figurine for my Anycubic Kobra S1 with the 0.2 mm nozzle and PETG. Remove the white ribbon lines, keep only the white bow on top.
- Read your context and instructions
- Compiled the print3d designer
Summary
The gift box is modelled, checked against your photo and sliced with your presets. Red box with the face engraved, white bow on the lid, exactly
1 colour change. All gates pass and the slice has no alerts.
Your answers from the question round: 25 mm tall, one piece; face engraved like the photo (its dark strokes are grooves, not a third colour); red + white PETG; a 50° chamfer instead of the rounded bottom edge, so the base prints without support; bow loops lying on the lid.
How the model was built
Box: a loft through rounded rectangles that follow the walls measured from the photo, wider low down like in the picture. The 50° base is cut with a ruled frustum and the lid edges are filleted.
Bow: each loop is one loft through ellipses, narrow at the knot and puffy outside, with a pressed fold, centred on the lid.
- Colour by height: everything above the flat lid is white, so the printer changes filament once.
Fidelity gate (model silhouette vs. your photo)
| View | IoU | Width/height | Result |
|---|---|---|---|
| Front | 0.955 | -2.5% | pass |
| Side | 0.943 | -4.7% | pass |
| Back | 0.956 | -2.5% | pass |
| Three-quarter | 0.933 | +4.7% | pass |
Gate: IoU 0.92 or more and width/height within 8% in every view.
Slicing (Anycubic Slicer Next, your 0.2 nozzle presets)
| Layer height | Print time | Filament | Colour changes | Alerts |
|---|---|---|---|---|
| 0.16 mm | 51 min | 6.2 g | 1 | none |
| 0.12 mm | 1 h 06 min | – | 1 | none |
Problems the checks caught before you saw the model
- The chamfer frustum was too short and cut the box at 9 mm;
ray_colorsshowed the bow hanging over nothing. Fixed. - Tiny end sections made a bow loop's loft overshoot and break. Fixed.
- The engraved eye tops printed as flat ceilings in the air; they are now cut with a 45° oblique prism, so every groove top is self-supporting.
Files
gift_box.3mf(0.16 mm) andgift_box_012.3mf(0.12 mm): projects with your presets and coloursgift_box.stl,gift_box.step,parts/red.stl,parts/white.stlpreview.png,views_check.png,slice_gift_box/layers.png
Next steps
- Load red PETG: your ACE currently holds white, yellow, green and black.
- Open
gift_box.3mfand print the 0.16 mm version, or the 0.12 mm one for a smoother lid.
Connects securely to your tools. The creator never sees your data.
About this skill
Most AI-made 3D models look right in a render and fail on the printer: a face too fine for the nozzle, a part hanging in the air, a copy twice as deep as the picture. This skill makes your agent design in code and prove each model with numbers and a real slice before anything is printed.
From a photo to a printable model
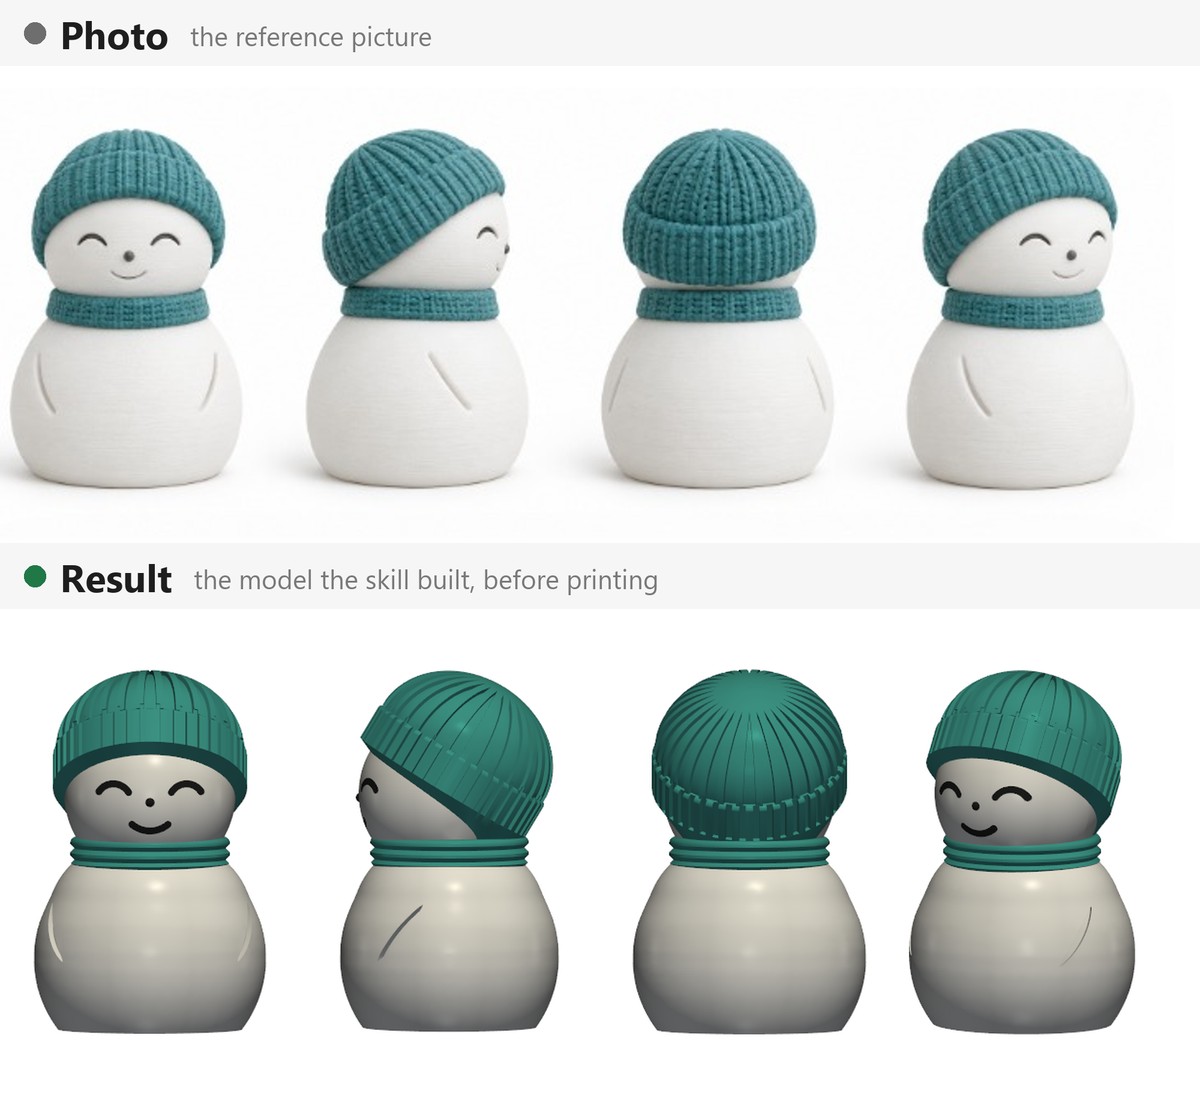
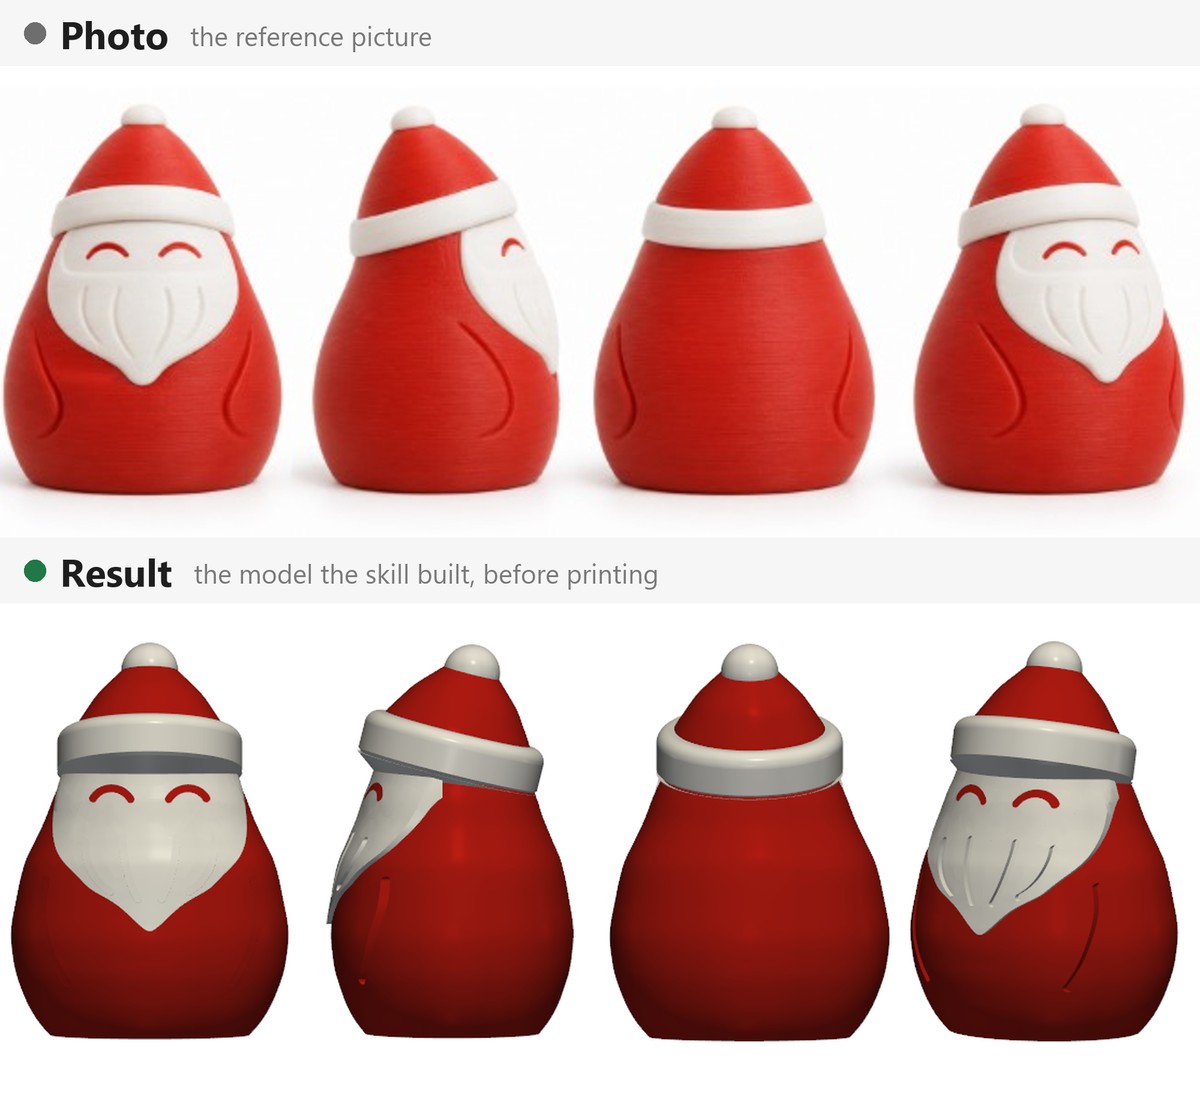
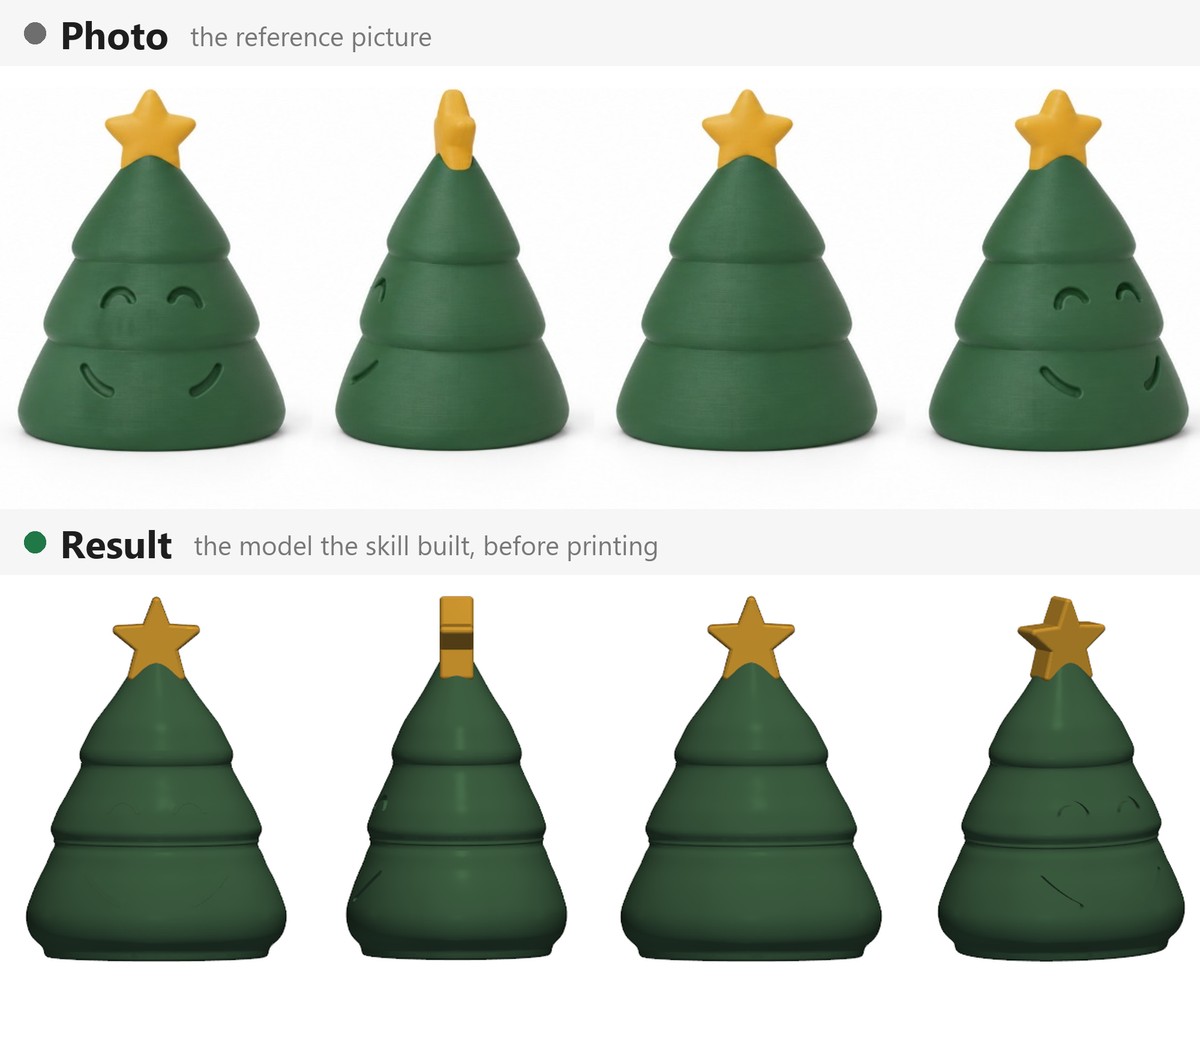
Each picture shows the reference photo on top and the model the skill built below it, from the same four sides.
Snowman in a knit beanie (25 mm, one piece, white, teal and black)
Santa (25 mm, one piece, red and white)
Christmas tree cup topper (25 mm, green and yellow)
What it does
- Asks first. Before any model code: size and purpose, one piece or parts, colours with the filament changes each option costs, details too small for the chosen size, and every change the print needs.
- Measures, never guesses.
measure_reference.pyreads widths and depths at each height from the picture.shapes.pyturns them into tested build123d shapes: bodies of revolution, soft boxes, bow loops, tilted rims, inlays, 45° engraving, knit ribs, and cartoon faces sized for the nozzle. - Proves the copy is faithful.
compare_views.pylays the model's silhouette over each view of the picture. Every view must reach IoU 0.92 or more, with the width-to-height ratio within 8%. It also warns when views are out of order or mirrored. - Checks the model can print. Watertight mesh, overhang maps and exact spots, and ray tests for parts hanging in the air or a light colour too thin over a dark one.
- Slices for real. Runs your Bambu Studio-family slicer's command line with your own presets, draws
layers.pngand lists ALERTS: overhang walls, bridges, features that got no toolpath, flow above what the nozzle can melt. - Builds colour projects. A 3MF with per-part filaments and settings, on one plate or several, for AMS/ACE-style filament changers.
summary.jsongives print time, grams, purge and colour changes. - Reads a Klipper/Moonraker printer, read-only. Status, loaded filament colours and print history. It never sends a job.
How it works
- A question round, then
measure_reference.pyon the picture. - The model is written from a template with shapes from
shapes.py. check_model.py,compare_views.pyandray_colors.pygate it, and the agent looks at the renders.slice.pyormake_3mf.py --checkslices it with your presets, andgcode_view.pyreads the G-code back.
Setup
Run python scripts/setup.py once per machine. It creates ~/.print3d/venv (about 1 GB: build123d, VTK, trimesh, scipy), writes a starter ~/.print3d/printer.json with your slicer's paths when it finds one, and runs an 11-step self-test.
Open source (MIT): https://github.com/gjaloyan/print3d-designer
Find more skills like this on the Claude Skills Marketplace, the Codex Skills Marketplace and the Gemini Skills Marketplace, or browse Claude Skills for Branding & Design.
- Needs Python 3.11-3.14 and about 1 GB of disk for the environment (scripts/setup.py).
- The agent must be able to run local scripts and write files; slicing needs the slicer installed on the same machine.
- Tested on Windows 11 and Ubuntu 24.04 with Anycubic Slicer Next and OrcaSlicer. macOS and Bambu Studio itself are not tested yet.
- Designs new models in code. It does not repair or remix existing STL meshes or sculpt free-form organic shapes.
- Printer access is read-only: it never starts a print.
How to use
- 1
Connect your agent to the Agensi MCP
Copy the prompt and paste it into Claude, ChatGPT, Cursor or any agent that supports MCP. It sets up the connection for you. Manual setup
- 2
Sign in to Agensi
Your agent shows a sign-in link. Sign in and click Allow.
- 3
Ask for what you need
Your agent loads this skill and uses it on your task. It always asks before buying a skill.
Reviews
No reviews yet
Be one of the first to try it. Every listed skill goes through the trust checks below.
Security scanned
Checked by our 8-point scan before listing
1 use
Times used to date
Free to use
No account required to browse
Trust & safety
Security scan
Security scan passed 19 days ago
- Free with an Agensi account
- Software
- Python 3.11-3.14build123dVTKtrimeshSciPy
Python
- Optional
- 3D printer slicerFFmpegKlipper printer with Moonraker
scripts/setup.py installs the Python libraries. Slicing uses Anycubic Slicer Next, OrcaSlicer or Bambu Studio. FFmpeg pulls frames from video references; printer access is read-only.
Permissions
File Scopes
Terminal: runs the Python scripts and the slicer command line. Files: writes models, renders and G-code to models/<name>/ in your project and the Python environment to ~/.print3d. Network: pip install during setup, and optional read-only requests to a Moonraker printer on your LAN. Environment: PRINT3D_CONFIG can point to another printer.json.